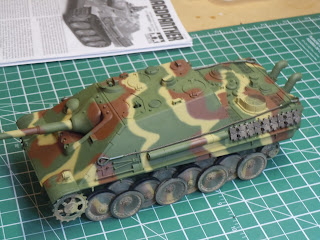
Well, the momentum of the Jagdpanther turns out to have waned. It actually took a turn I didn't want and had to retrench.
I spent a few days painting the beast, I used Tamiya paints, and tried to accomplish a standard factory camo job of early 1945.The factory applied job has harder edges and is applied to many vehicles of the period.
It didn't come out the way I wanted, the edges came out way too harsh. I tried blue sticky tack but it wasn't standing off enough, and I tried Steve R.s Iawata (or Ia-wanta) free hand, but I couldn't get a handle on the double action. I put on too many coats to correct little mistakes and it was building up too much. Then to add insult to injury, the Testors Gloss Cote rattle can made the colors look way too dark.
You take a look.... (third pic has the Glosscote)
So, I put the beast in a tub with a half a can of Easy Off Oven Cleaner and took it back to sprue color. No damage, thanks to Tamyia and Testors glue, HOWEVER, the CA glue used for the Photo etch grills dissolved way to easy. I managed to find them and used them again.
It was ready for take two. I started with a coat of Model Master gray primer a few days ago. Today I put on the XF-58 Olive Green base boat. Learning from last time, I did this in three phases:
- XF-58 Olive Green - lower areas under the sponsons
- 4 parts XF-58 Olive Green/ 1 part XF-60 Dark Yellow - on vertical sides
- 3 parts XF-58 Olive Green/ 1 part XF-60 Dark Yellow - on horizontal surfaces sprayed from above
This put a lighter color on the top viewable surfaces and allowed a layering affect to achieve some overall color modulation. I feathered the top color on the big side, back and front slabs just to break up the big plates. I will put other colors on covers and hatches to get some more modulation later.
The photos are not the best, some day I hope to do better, maybe someone will teach me :)
I give you Jagdpanther - take two...
So much for now. I will attempt the camo pattern, but I think I may do it free hand with my Badger 200. OR I may use sticky tack again, but use card, laying over the sticky tack to prevent overspray. I will let you know how it goes..........


