My main area of interest appears to be green models from the Allied WWII European Theatre - 1944-45.
I go astray a few times, but usually go back there.
I am not a master modeler and I am not showing off, just using this as a venue to express myself and show people who are interested in this kind of stuff what I have done.

Sunday 13 November 2011

In Progress - Jagdpanther - Update 3.3

Well a little bit of progress.....
Lots of things on the go around the house and at work, so not making much headway, but this is the longest part of my builds... the finishing. I contemplate a lot at this stage, I am always afraid of going somewhere I can't return from and the investment in time (and money) makes me cautious not to ruin it.

What I have done so far is work on the wheels and wheel wells so I can put on the side skirts.
I put on the wheels, tracks and have glued the skirts on, painted the seams and blended the colors to match.

I have at this point put on decals (over a coating of Future Floor polish) and put on a wash coat of Winsor and Newton Yellow Ochre oil, followed with an overall filter with Winsor and Newton Burnt Umber. I then did a pin wash on the seams and high lites with Burnt Umber but it is not standing out, I may go over it with some black.

I haven't painted the tools or other accessories yet, I think I will do that next and seal it with a dull cote.
Then I will do some scratching and paint shipping, not sure what order I will do it in.

Near the end I will use pigments on the tracks and lower areas.

Here are some update shots.


Wednesday 19 October 2011

In Progress - Jagdpanther - Update 3.2

I am a little more satisfied with this version.

The yellow is added, again free hand with my Badger 200, I then went over the edges with the finest Green spray I could get to cover overspray droplets. Plus another dab of red, and then Yellow again when the green overspray was too noticeable.

Still using Tamiya Lacquer thinner with Tamiya acrylic paint. Yellow is 4:1 - Dark Yellow XF-60: White XF-2.
AND using it in the shed, not the house, even though I have a paint booth with exhaust fan.  I will have to revert to Acrylic thinner for the winter months..

Some progress photos...


Monday 10 October 2011

In Progress - Jagdpanther - Update 3.1

So today I tried the camo free-hand with my trusty Badger 200. A lot better success. Not the tightness I want, and when I do Yellow I know the over-spray will be more noticeable,
But my plan is to use the bllue sticky tack, just beyond the edge, so I only correct the over-spray, and not touch the Red Brown (or Dark Yellow, when it comes) at all. Hopefully it will leave the feather edge I am looking for.

I took the XF-64 Red Brown and added a bit of XF-7 Red (4:1) to lighten it up and make it more Red Brown. Jagdpanthers of this period according to some documentation, did not actually use Red Brown, they stuck with the factory Red Primer, just added the Green and Yellow over that and left the Red Brown areas as is- time saving and material saving, things were getting REALLY desperate in the last few months of the war.

This is what I have so far.


Yellow to come as time permits in the next few days...

Sunday 9 October 2011

In Progress - Jagdpanther - Update 3

Well, the momentum of the Jagdpanther turns out to have waned. It actually took a turn I didn't want and had to retrench.

I spent a few days painting the beast, I used Tamiya paints, and tried to accomplish a standard factory camo job of early 1945.The factory applied job has harder edges and is applied to many vehicles of the period.

It didn't come out the way I wanted, the edges came out way too harsh. I tried blue sticky tack but it wasn't standing off enough, and I tried Steve R.s Iawata (or Ia-wanta) free hand, but I couldn't get a handle on the double action. I put on too many coats to correct little mistakes and it was building up too much. Then to add insult to injury, the Testors Gloss Cote rattle can made the colors look way too dark.

You take a look.... (third pic has the Glosscote)


So, I put the beast in a tub with a half a can of Easy Off Oven Cleaner and took it back to sprue color. No damage, thanks to Tamyia and Testors glue, HOWEVER, the CA glue used for the Photo etch grills dissolved way to easy. I managed to find them and used them again.

It was ready for take two. I started with a coat of Model Master gray primer a few days ago. Today I put on the XF-58 Olive Green base boat. Learning from last time, I did this in three phases:

  • XF-58 Olive Green - lower areas under the sponsons
  • 4 parts XF-58 Olive Green/ 1 part XF-60 Dark Yellow - on vertical sides
  • 3 parts XF-58 Olive Green/ 1 part XF-60 Dark Yellow - on horizontal surfaces sprayed from above
This put a lighter color on the top viewable surfaces and allowed a layering affect to achieve some overall color modulation. I feathered the top color on the big side, back and front slabs just to break up the big plates. I will put other colors on covers and hatches to get some more modulation later.

The photos are not the best, some day I hope to do better, maybe someone will teach me :)

I give you Jagdpanther - take two...


So much for now. I will attempt the camo pattern, but I think I may do it free hand with my Badger 200. OR I may use sticky tack again, but use card, laying over the sticky tack to prevent overspray. I will let you know how it goes..........

Wednesday 28 September 2011

In Progress - Jagdpanther - Update 2

I have been working the paint job. Pretty much finished the camo, ready for the clear coat for decals and weathering.

I usually do filters and pin washes on the raw Tamiya XF, but am not satisfied with the tide(?) markings/stains that happen with flat paint. Hard to get them out. So I will try that on glossy (Future) clear coat.

Of all the pictures I took, none were good enough to post today.
Hopefully some pictures coming this weekend.

Saturday 20 August 2011

In Progress - Jagdpanther - Update 1

The Tamiya Jagdpanther - I am gone a little bit German again.
I threatened in Past Work 2 to put this one next on the bench, and I did. That was 6 days ago. I am just about ready for priming. For me that is phenomenal work to get this far this quickly.

I think this week I have spent about 7 or 8 hours building. Not sure if it is the blog driving me, the kit itself  (It is Tamiya at its best - you shake the box and the parts just fall together), or I am looking at the unbuilt kits on the shelf, remembering my age, and I am the one with the shorter shelf life, not the models.

So anyway, this thing just floats together by itself. Not knowing a lot of the history of this beast, so doing just a bit of reading, I built the kit as is, no scratch mods, no aftermarket (I am lying here, see below), and no special work other than scraping seam lines for cleanup.

This is the LATE Jagdpanther, so no Zimmerit, (thanks be to whatever higher power you look up to). Did I ever tell you that I hate Zimmerit?

This will be a Jagdpather in 1945 - post Bulge, probably March/April - so no excess mud going on, just dust.  The kit has options for the very late production model to meet this time frame (See exhausts for example).
I really want to try some paint chipping on this one. I found a site that a guy has for selling built kits. He does great work, and he really has the rust/chipping technique down pat (some are overdone, but the technique is fantastic!) Check out this link for Finn Hobby. It takes you right to the AFV section.

I think I like the tri-color camo pattern from this time period better as well. According to what I am reading, prior to 1945 the tri-color was base Yellow, with Green overlay only in the summer (1944 anyway) and added Red in the fall. In 1945, and I didn't know this, they changed to Green base with patches of Yellow and Red. It was the overabundance of green instead of yellow that draws me to this type of camo.

So when I looked at this the other day as it was shaping up, and had looked at pictures of completed builds, I saw a glaring oversight. This kit REALLY needs the Photo Etch (PE) screens over the air intake grills on the back deck. So back to eBay, and for $14 I got a set coming in the next week or two.

Being somewhat impatient when it comes to waiting, I dived into an unbuilt Dragon Panther G w/Zimmerit already on it - kit 6384 (again - thanks be to whatever higher power you look up to). I robbed the PE set of grills that came with that (both G models, same basic chassis - thus interchangeable), and when I go to build the Panther (which just might be next - I am on a German roll now), the ones from eBay will be here.

With apologies to General Ira Eaker... 8th Air Force
"I won't do much more talking until I've done more building"

Some progress picks...

(right side only, I don't have the schurzen rail glued on the left side yet).


Interlude - Comments

I am under no illusion that this blog is one of the most interesting and most watched internet masterpieces of all times. However with 62 views so far, mostly mine and at least one from the one person I have told about this, I am sure there are at least three other people from somewhere in the world who have looked at this..

I would think that MAYBE someone surfs into here from some obscure search on your favorite engine that lands you here. If so great, I hope you take away something from it, if not, then sorry to waste your time. I know if I don't grab you in the first 4 seconds you are gone to the next hit. So I try to leave examples of my work, and some words that may help you in your endeavors in the future.

Whatever you do to get here, if you have a few seconds, I would encourage you to leave a comment of some sort, even just to say Hi.

I would ask that you think before you write, my kids look at this too.

So where in the hell do you leave comments?
If you didn't know, and I didn't, and it was pointed out to me.
At the bottom of each post is a reference to the number of comments
( i.e. 0  Comments). They are all 0 now :).
It is a link and if you click on that it will pop a screen for you to leave your comments.


Thanks
Joe


In Progress - Sherman M4A3E2 Jumbo Take 1 - Update 1

Why Take 1 you say? Just keep reading.

The Sherman Jumbo, as an oddity, has had my interest for years. Partly because it IS an odd duck with an interesting story, and because there were no models of it. What do you mean Tamiya does? HA, as I said, no good models of it.

So about a year ago, in the same stash raid as when I got the M20 (see Past Work 4)  from John O"Reilly (God rest his soul), I took the Tamiya M4A3E2 he had there as well. He gave me SUCH a great deal on everything I flipped a few more bucks and took it out of curiosity. Like the cat, it almost killed me. Tamiya makes good   _quality_   kits, but this one is no where near accurate, especially on the transmission cover, the whole turret, and still had the trenches for welds on the upper hull, etc and no sponson covers above the tracks.

SO, it sat there for a while as "reference" and heated my desire to build it or a reasonable facsimile thereof.
So off to eBay I went and got the Tank Workshop aftermarket transmission cover and turret resin parts. I was determined to fix up the hull like my hero Steve Zaloga did on his. I have his book to go by :)

So I got the parts and looked at a dry fit. The trenches were staring at me and I knew I would have to let them down, because I looked on the shelf and there was a half finished Dragon M4A3 76mm (6325) sitting there. I had bought two of them three Christmas' ago from DragonUSAOnline when they were $27  US on sale (YEAH!!- Really!!) I built one and the other was not finished (I did them as a pair for so long and went on with one). See that one in Past Work 3 , It is the top Sherman.

SO, I scrapped the tranny cover from the Dragon kit without damage, popped off some photo etch parts, and salvaged the additional armor for the side and front glacis from the Tamiya kit, took the new TWS tranny cover and turret, and figured that I could bash that together. A bit of Apoxie Sculpt here, and some sprue there, with some evergreen strips and I was smokin'. The only real challenges I had with accuracy were the front bogies section which are supposed to squat down further in the front due to all the weight of the bigger, thicker transmission cover, the extra armor and the larger mantlet. I was bashing so I figured I would go scratching as well. I took one bogie assembly from each side for the front and put them aside. I did some cutting and plugging and bending and gluing to make the wheel arms more straight than the rest, and hid it all behind the bogie cover.

A shout out to my old Army buddy and still friend 32 years later, Steve R., for the green sticky putty that was ESSENTIAL for attaching plastic/photo etch to resin on the turret. Thanks for the advice bud, it worked great!

It worked well enough for me that I figured I might eventually have a decent Jumbo on the display shelf in the workshop.

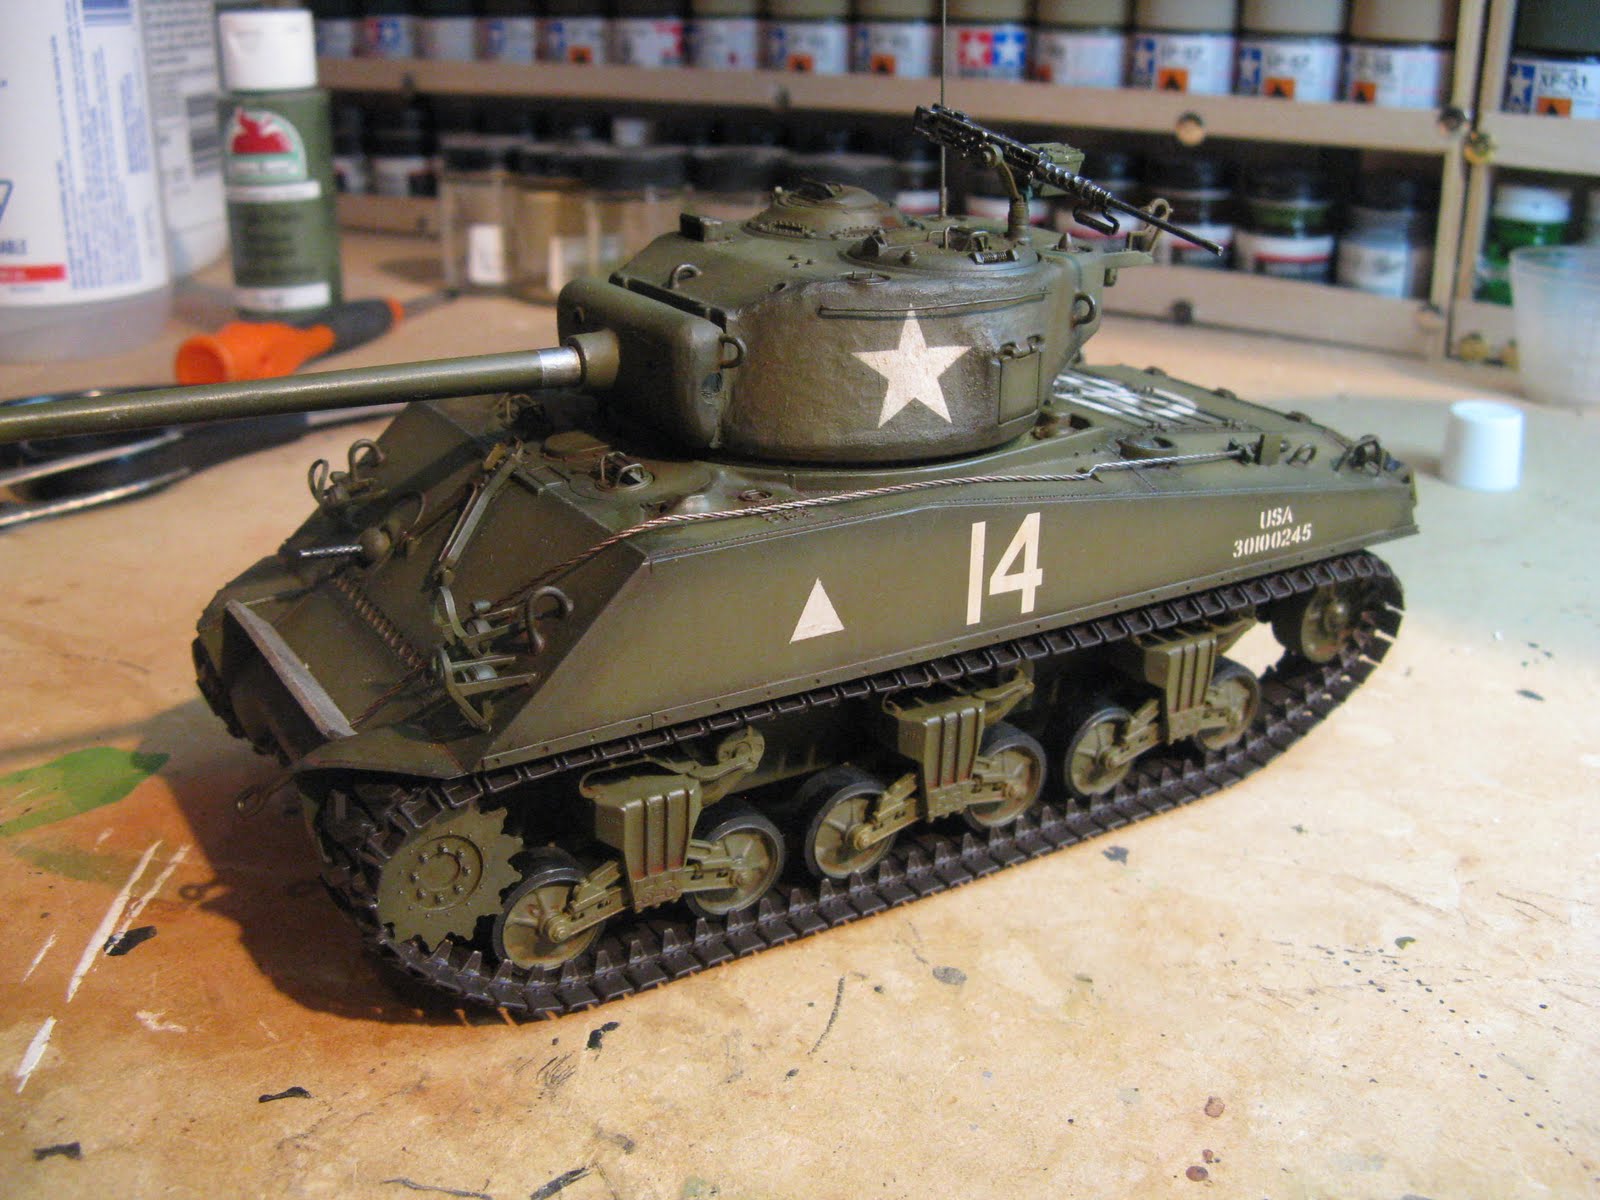
SO FAR...I have primed and painted a base coat on it. I have also done a little bit of color modulation, with various pieces having slightly different colors and I have, as I have before, post shaded all edges and protrusions with a shade darker on the base coat (raw Tamiya XF-62). I now just need to go back over it with base color (off shaded) and thin up the post shading to make is less edgy. My base coat (Olive Drab) by the way is what I call Zaloga OD (again after my hero Steve Z.), which is Tamiya XF-62 OD/Tamiya XF-60 Dark Yellow in a 60/40 mix. I use an empty Tamiya bottle to make alot of it so that I can get a consistent color over many painting sessions.

A note on the painting. Based on the results from another friend, Chris J., I used Tamiya laquer thinner (yellow cap) with Tamiya acrylic paint instead of Tamiya acrylic thinner and used an even lower compressor setting (10-12 PSI) and the finish is in my opinion much nicer. I used to get a pebbley effect before but this is MUCH smoother. This was with a Paasche Model H airbrush for large things like primer and base coat - Badger 200 for finer detail stuff later.

What looks like chain link fence on the side of the hull and turret - is chain link fence (actually something called Tulle from Michael's craft store). They called it Sommerfield matting and it is used to poke foliage (that fancy for branches) to hold it for camouflage. My hero Steve Z. did it to his, so... I think there is a great opportunity to do some paint chipping and rusting techniques on it. Can't wait.

Here is progress so far:


Sooooo, yeah, Why take 1?

Well, as I was getting into this and had my money spent (more than I figured going in..).......Tasca comes out and does this. And guess what I got for Fathers Day?


Sigh.

Saturday 13 August 2011

Past Work 5

T26E3 Pershing (Tamiya)
This kit jumped off the shelf at me at the local Hobby Shop a few years ago. It was about the time I was reading Steve Zaloga's "Thunderbolt" book which dedicated a chapter to Project Zebra, the introduction of the Pershing in the last months of the European Theatre in WWII as a "production" test.

As always with Tamiya, it was a pleasurable build. I tried some of my post shading techniques for the first time to add a small level of color modulation by going dark on all the edges and high points.

I am nowhere near a master modeler but this was one of my best to date.
These shots were taken today and it is getting a bit dusty. Check last photo for a shot before weathering. Better light - Yeah my photog skills are non existent, bad setting, bad equipment.

OMG I almost forgot this. I entered this one in a show and was sick of always closing the hatches, so I asked my friend Ray Welshman, an accomplished and award winning figure painter to paint a couple of crew for me.

He did a fantastic job, Thanks for that Ray!.


Past Work 4

This piece is a tribute to John O'Reilly, former  Canadian Armed Forces CER officer (Combat Engineer Regiment), IPMS SJ member, and in the short time I knew him - a friend. In what must have been his last stash sell off before he passed last year, I got this and several others kits from him. This is the first one of them I built and it is in his honor.

Thanks for your service and rest in peace John.

The Italeri M20 Scout Car.


Past Work 3

Shermans Shermans Shermans - I am a shermalohic.

My first armor kit was the Monogram Sherman M4A1 Calliope when I was a kid. Something happened and I fell in love.

I have progressively used Shermans to TRY to improve my modelling skills, primarily in the painting and weathering department.

Some of my favorites in no particular order..
Dragon M4A3 76mm (Kit 6325)
Dragon M4A3E8
Italeri M4A1

(Actually the M4A3E8 is my favorite)


Past Work 2

I did a bit of German too. These are from a few years ago.

The Panzer Kampf Wagon IV Aust H (Academy) and the Tamiya SdKfz 251/1 (Tamiya). My favorite German types obviously. I like the look, the lines and how the tri-color camo totally changes the perception. (compared to the older grey from the 39-40 campaigns).

These are not show pieces, the 251 was done years ago before the airbrush skills got better and too lazy to weather further.

The Pz IV was an ordeal to put together, fit was not the best. I rushed the painting and finish. Still good learnings for the next German armor.

In the stash King Tiger II (Dragon - w/zimmerit) and the Jadgpanther (tamiya).
I just got the Jadgpather at a swap meet, it might be next on the bench.

Take a quick look and then move on....


Past Work 1

Tamiya Mustang III - Dearly love the Mustang, dearly love RAF camo, so best of both worlds. I am primarily an Armor guy, but will "cleanse" every now and then with something like this. This was my first serious attempt to improve my aircraft skills, from base coating to camouflage to decals.

My very first attempt at sludge washing. I learned a few things on this one for the next time..
After decals set and dried - lightly scribe the panels lines where the decals are set to have uniform depth overall for the sludge wash, otherwise the panel lines will not look consistent (or be gone altogether). One friend suggested just a cut in the recess with a knife to avoid ripping the decal.

I will try both techniques next time, Anyone have any advice there?


Friday 12 August 2011

Opening words

Just a post to kick start this off.
I hope to post some of my work, (it takes me a while to get something done, so I may do some WIP shots).

I also hope to highlite some of my friends works or at least a link to it (with their permission).

AND I may post links or references to some articles I think may be helpful or interesting as you continue your own journey in this hobby.

And we are off................